Nyx(Flash Tease Editor) Tips and Tricks
Posted: Tue Oct 13, 2009 1:01 pm
I'm wanting to share some "Tricks" you can use when writing Flash teases.
When you take a closer look at the commands, that you can use to create your flash teases with, you'll quickly see that flash teases are highly customizeable.
Even though they are, I have rarely seen teases that use these functions wisely. I guess It's because the documentation lacks scripting examples ;).
Contents
0. A Basic Page in Nyx
1. Multiple Options with preview Images and no side frame.
2. Display Images onto the frame on the right.
3. Open a Random Page.
4. Sounds
5. Downloading the Source of any given Flash-Tease
6. What you can't do.
7. Adding a Rating-Feature to your Flash Tease (Outdated)
8. Embedding Videos in your Tease
9. set() and unset()
10. The must(), mostnot(), numactionsfrom() and numactions() commands
0. A Basic Page in Nyx
This is the basic code of a page in Nyx. First usually is your text, than comes the pic, which is displayed above the text, and after that comes the action, or timer, buttons... More information on how to use the basic commands on the helpfile.
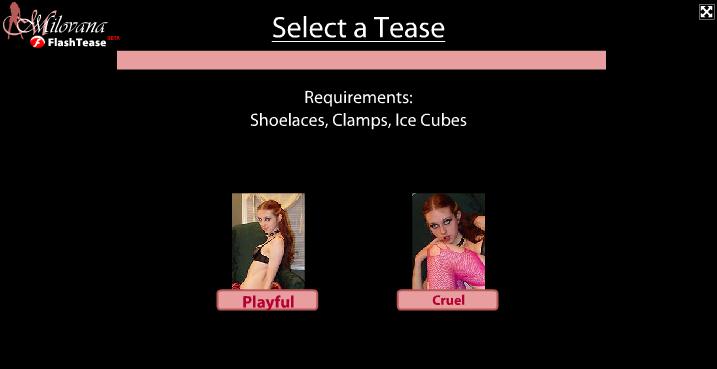
1. Multiple Options with preview Images and no side frame. (That's how I've done the first page of my "Playful And Cruel" Tease.
You can just copy and paste this code to get a multiple selection page for your tease.
I'm using the functions "horiz" and "vert" to allign the images and buttons in a row. I'm also tricking the editor by not filling out the first Option of "page". That results in the right frame to disappear. Good for a first page that requires multiple selections.
When looking at the code you'll see lots of "IIIIIIII". I'm using a negative letterspacing to generate the Illusion of a straight line. Experiment with this script and customize it any way you want ;).
Outcome:
2. Display Images onto the frame on the right.
You can use this method to display preview images or any other images onto the frame on the right.
I'm using it for dice rolling in "Playful and Cruel". It displays the dice on the right frame.
Here's how it works. I'm using a combination of "horiz" and "vert" to display the graphic of the dice above the button. Just copy and paste it to nyx to check it out.
You can use this method to display any image you like on the right frame.
Outcome:
3. Open a Random Page.
So this is kinda tricky. But once you understood the concept it will be really easy to use.
First of all you need to create a page that is supposed to link to a random page.
We're using the function range embedded in go to select the next page randomly.
a)
Now you need to have the pages defined in "range". For this example you will ned to have page 1,2,3. If you didn't create all of these, your script will not work correctly!.
Define Page 1 to 3 like this (The Names will have to be Numbers(1,2,3)):
b)
4. Addings Sounds.
Upload your sound File to your "Media" First.
Here are some examples on how to use sounds:
Play a sound once
Loop A sound X times
Sound + Delay and Buttons
5. Downloading the Source of any given Flash-Tease
If you want to see the source of a flash tease, to see how someone made a certain function, or to fix the flash tease, you can simply download the source.
Here's how you do it.
a)
Get the Id of the Tease:
- Open the Tease
- In the adressbar you'll find something like this: "http://www.milovana.com/webteases/showflash.php?id=2909"
- 2909 is the id in this example
b) to get the script open the following page:
http://www.milovana.com/webteases/getscript.php?id=2909
This will get the script of the flashtease with id 2909.
6. What you can't do. So don't even bother trying")
Even though Flash teases are very customizeable there are certain tasks you can't do (yet).
- Changing the background color is not possible, since the background color is not defined by your script, but by the page the script is embedded on.
- Changing The overall layout, like the apperance of buttons, timer and such is not possible, since the availabe designs for buttons and timer... are defined by the flash-tease-viewer.
- Clickable weblinks also seem to be impossible to use( But I didn't really try it yet, maybe there's a way).
7. Adding a Rating-Feature to your Flash Tease (Outdated)
So first of all, I have to say, that this is rather for the tech-savy people. Anyone that never used a ftp programme, or does not know how to upload files to a webserver, and set rights (chmod) for files, will have a tough time following this tutorial.
Anyways, I'm willing to help you out, just send me a PM with a link to your finished tease, and I'll add this feature for you asap.
For anyone that want's to add this functionality on their own, read on.
Requirements:
[*] A programme to uncompress a .zip file
[*] A webserver with php and GDlib.
[*] An ftp client like File Zilla
[*] Knowledge on how to use both
[*] My Rating script ( attachement )
0. Unpack the FlashTeaseRating.zip archive.
1. Upload the "rating" folder to your Webserver via Your FTP Client.
2. For the following files set CHMOD 666 (Read/Write access)
[*] voting.txt
[*] ips.txt
[*] hitcounter.txt
You're done with the server part.
3. Open up your tease in NYX
4. Open your Tease in script view.
5. Rename the "start#" page from your tease to "teasestart#"
6. At then end, add the following:
7. In the above-noted code, change every "yourserver.com" to the adress of your server.
8. Let the last page of your tease link to "rating#". For Example use:
That will show the rating-menu after 5 seconds.
You're all set, enjoy your new rating feature.
8. Embedding Videos in your Tease
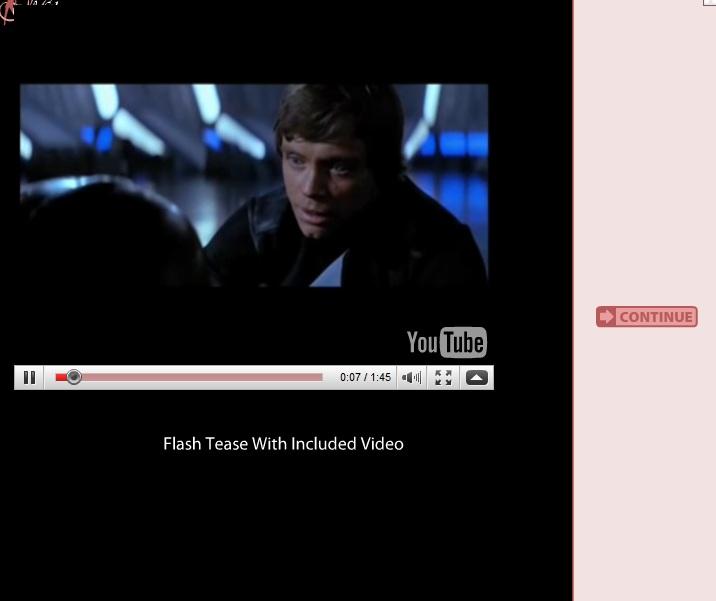
I'll show you how it works with youtube Videos. The technique should basicly work with any other Video Site as well though.
1. Find a Video on youtube. Run it.
2. On the right theres the code to embedd the Video onto websites. Copy that code!.
It should look somewhat like thise:
Now "object" and "embed" are tags nyx does not support. Buuut.. it does support the image tag, which is able to load .swf files.
So now you need to morph this code into a code nyx can read.
a) Delete everything but
b) Change "embeded" to "img"
c) Crop the code further until you have this
<img src="http://www.youtube.com/v/3eZBevXohCI&hl ... width="480" height="385"></img>[/code]
d) To tell the Video to automaticly play, you need to add: "&autoplay=1" to the URL, like this:
Thats your finished code. Now lets embed it into your flash tease.
3. Open up your tease in script view, and the page where you want to insert the code.
For example:
a) Remove the "pic" part, and replace it like that with your code from 2.:
You're set!. Feel free to change the size, by altering the width and height parameters accordingly.
9. set() and unest()
These commands can be used to make the range command (See 3.) generate a page multiple times, or to not generate a certain page after another page is called. It can also be used for the commands seen at 10.
set() and unset() can be used where your buttons or timer are called, you just embed it in a "mult()" function.
It looks like this:
This example, on "page3" will set "page 1", so that it cant be triggered by the randomizer("range") anymore and unset "page 2", so that it can be called by the randomizer (again).
10. The must(), mostnot(), numactionsfrom() and numactions() commands
I will provide commented code examples for all those functions.
a. must()
A certain page "must" be set in order to show another page.
ie.: Every Punishment must be done, in order to receive release ;).
This Example Requires page 1 to be set in order to call page3.
Attention: theres must not be a # after the page number for some reason.
b. mustnot()
Does the opposite fromw hat must() does, same parameteres (self,page(no #)).
c. numactionsfrom()
Is used to make an certain count of pages required in order to show a page.
This function requires 3 parameters, while the first one is the page its placed on, the second one is the page its supposed to start counting, and the last one is the number of pages its counting.
This Example requires page 2 and 3 to be set. Meaning, only after the (ie.) "range(See 3.)" command generated page 2 and 3 page 1 will be triggered.
d. numactions()
The same as numactionsfrom, only that it always starts counting at page 1 and thus only requires two parameteres. First Parameter: Self, Second Parameter: Count.
__________
That's it.
I hope you found it helpful and got an Idea how to customize your flashteases. Feel free to play around with all the functions seraph0x created to make individual flash-teases ;).
If you got any questions concerning the methods described here, feel free to ask.
Also feel free to suggest more tips/tricks.
-green-
When you take a closer look at the commands, that you can use to create your flash teases with, you'll quickly see that flash teases are highly customizeable.
Even though they are, I have rarely seen teases that use these functions wisely. I guess It's because the documentation lacks scripting examples ;).
Contents
0. A Basic Page in Nyx
1. Multiple Options with preview Images and no side frame.
2. Display Images onto the frame on the right.
3. Open a Random Page.
4. Sounds
5. Downloading the Source of any given Flash-Tease
6. What you can't do.
7. Adding a Rating-Feature to your Flash Tease (Outdated)
8. Embedding Videos in your Tease
9. set() and unset()
10. The must(), mostnot(), numactionsfrom() and numactions() commands
0. A Basic Page in Nyx
This is the basic code of a page in Nyx. First usually is your text, than comes the pic, which is displayed above the text, and after that comes the action, or timer, buttons... More information on how to use the basic commands on the helpfile.
Code: Select all
SiteName#page(
	'Your text',
	pic([...]),
	Action or Button here
);You can just copy and paste this code to get a multiple selection page for your tease.
I'm using the functions "horiz" and "vert" to allign the images and buttons in a row. I'm also tricking the editor by not filling out the first Option of "page". That results in the right frame to disappear. Good for a first page that requires multiple selections.
When looking at the code you'll see lots of "IIIIIIII". I'm using a negative letterspacing to generate the Illusion of a straight line. Experiment with this script and customize it any way you want ;).
Code: Select all
start#page(
'',
vert(
    text('<p><FONT SIZE="30"><u>Select a Tease</u></FONT></p><TEXTFORMAT LEADING="2"><P ALIGN="CENTER"><FONT SIZE="28" COLOR="#E89E9E" LETTERSPACING="-6" KERNING="-  55">IIIIIIIIIIIIIIIIIIIIIIIIIIIIIIIIIIIIIIIIIIIIIIIIIIIIIIIIIIIIIIIIIIIIIIIIIIIIIIIIIIIIIIIIIIIIIIIIIIIIIIIIIIIIIIIIIIIIIIIIIIIIIIIIIIIIIIIIIIIIIIIIIIIIIIIIIIIIIIIIIIIIIIIIIIIIIIIIIIIIIIIIIIIIIIIIIIIIIIIIIIIIIIIIIIIIIIIIIIIIIIIIIIIIIIIIIIIIIIIIIIIIIIIIIIIIIIIIIIIIIIIIIIIIIIIIIIIIIIIIIIIIIIIIIIIIIIIIIIIIIIIIIIIIIIIIIIIIIIII  IIIIIIIIIIIIIIIIIIIIIIIIIIIIIIIIIIIIIIIIIIIIIIIIIIIIIIIIIIIIIIIIIIIIIIIIIIIIIIIIIIIIIIIIIIIIIIIIIIIIIIIIIIIIIIIIIIIIIIIIIIIIIIIIIIIIIIIIIIIIIIIIIIIIIIIIIIIIIIIIIIIIIIIIIIIIIIIIIIIIIIIIIIIIIIIIIIIIIIIIIIIIIIIIIIIIIIIIIIIIIIIIIIIIIIIIIIIIIIIIIIIIIIIIIIIIIIIIIIIIIIIIIIIIIIIIIIIIIIIIIIIIIIIIIIIIIIIIIIIIIIIIIIIIIIIIIIIIIIIIIIIIII  IIIIIIIIIIIIIIIIIIIIIIIIIIIIIIIIIIIIIIIIIIIIIIIIIIIIIIIIIIIIIIIIIIIIIIIIIIIIIIIIIIIIIIIIIIIIIIIIIIIIIIII</FONT></P></TEXTFORMAT>Requirements:<p></p>Shoelaces, Clamps, Ice Cubes'),

    horiz(

  text(<FONT COLOR="#f000000">----------------------------------------------------------------------</FONT>),

    vert(
      pic("*.jpg"),
      buttons(playful1#,"<FONT COLOR="#B30033" SIZE="17"><b>Option 1</b></FONT>")
    ),

    vert(
      pic("*.jpg"),
      buttons(cruel1#,"<FONT COLOR="#B30033" SIZE="14"><b>Option 2</b></FONT>")
    ),

   vert(
      pic("*.jpg"),
      buttons(cruel1#,"<FONT COLOR="#B30033" SIZE="14"><b>Option 3</b></FONT>")
    ),

text(<FONT COLOR="#000000">----------------------------------------------------------------------</FONT>)
  )

)
);2. Display Images onto the frame on the right.
You can use this method to display preview images or any other images onto the frame on the right.
I'm using it for dice rolling in "Playful and Cruel". It displays the dice on the right frame.
Here's how it works. I'm using a combination of "horiz" and "vert" to display the graphic of the dice above the button. Just copy and paste it to nyx to check it out.
You can use this method to display any image you like on the right frame.
Code: Select all
1#page('<TEXTFORMAT LEADING="2"><P ALIGN="CENTER"><FONT FACE="FontSans" SIZE="18" COLOR="#FF66CC" LETTERSPACING="0" KERNING="0">Its a one, that means that you dont get to cum
today. Poor boy *smiles*. Feel free to try your luck again tommorow, Ill be here.  Oh, and take those clamps off.</FONT></P></TEXTFORMAT>',
pic("no-016.jpg"),
horiz(
vert(
pic("dice1.jpg"),
buttons(endplayfulnocum#,"Ok")
)
)
);3. Open a Random Page.
So this is kinda tricky. But once you understood the concept it will be really easy to use.
First of all you need to create a page that is supposed to link to a random page.
We're using the function range embedded in go to select the next page randomly.
a)
Code: Select all
randomizer#page(
'The next page will be randomly selected',
pic("no-015.jpg"),
go(range(1,3,'page'))
);
Define Page 1 to 3 like this (The Names will have to be Numbers(1,2,3)):
b)
Code: Select all
1#page('This page shows up if range generated a 1',
pic("yourpic.jpg"),
buttons(whereyouwanttogo#,"Ok")
);

2#page('This page shows up if range generated a 2',
pic("yourpic.jpg"),
buttons(whereyouwanttogo#,"Ok")
);

3#page('This page shows up if range generated a 3',
pic("yourpic.jpg"),
buttons(whereyouwanttogo#,"Ok")
);
Upload your sound File to your "Media" First.
Here are some examples on how to use sounds:
Play a sound once
Code: Select all
page9#page(  //"page9" is the name of the newly created page
  'Text Goes Here',   // Text thats below your Image
  pic("no-106.jpg"),  // Image
  delay(2min, start#,style:secret),  //Secret Timer with a delay of 2 mins
  hidden:sound(id:'bird.mp3') // Sound that plays Once
);
Code: Select all
page9#page(  //"page9" is the name of the newly created page
  'Text Goes Here',   // Text thats below your Image
  pic("no-106.jpg"),  // Image
  delay(2min, start#,style:secret),  //Secret Timer with a delay of 2 mins
  hidden:sound(id:'bird.mp3',loops:10) //should loop 10 times
}
Code: Select all
page9#page(
  'Text Goes Here',
  pic("no-106.jpg"),
  vert(
    delay(2min, start#,style:secret),
    buttons(1#,"Button1",2#,"Button2"),
    hidden:sound(id:'bird.mp3',loops:5)
  )
);
5. Downloading the Source of any given Flash-Tease
If you want to see the source of a flash tease, to see how someone made a certain function, or to fix the flash tease, you can simply download the source.
Here's how you do it.
a)
Get the Id of the Tease:
- Open the Tease
- In the adressbar you'll find something like this: "http://www.milovana.com/webteases/showflash.php?id=2909"
- 2909 is the id in this example
b) to get the script open the following page:
http://www.milovana.com/webteases/getscript.php?id=2909
This will get the script of the flashtease with id 2909.
6. What you can't do. So don't even bother trying
Even though Flash teases are very customizeable there are certain tasks you can't do (yet).
- Changing the background color is not possible, since the background color is not defined by your script, but by the page the script is embedded on.
- Changing The overall layout, like the apperance of buttons, timer and such is not possible, since the availabe designs for buttons and timer... are defined by the flash-tease-viewer.
- Clickable weblinks also seem to be impossible to use( But I didn't really try it yet, maybe there's a way).
7. Adding a Rating-Feature to your Flash Tease (Outdated)
So first of all, I have to say, that this is rather for the tech-savy people. Anyone that never used a ftp programme, or does not know how to upload files to a webserver, and set rights (chmod) for files, will have a tough time following this tutorial.
Anyways, I'm willing to help you out, just send me a PM with a link to your finished tease, and I'll add this feature for you asap.
For anyone that want's to add this functionality on their own, read on.
Requirements:
[*] A programme to uncompress a .zip file
[*] A webserver with php and GDlib.
[*] An ftp client like File Zilla
[*] Knowledge on how to use both
[*] My Rating script ( attachement )
0. Unpack the FlashTeaseRating.zip archive.
1. Upload the "rating" folder to your Webserver via Your FTP Client.
2. For the following files set CHMOD 666 (Read/Write access)
[*] voting.txt
[*] ips.txt
[*] hitcounter.txt
You're done with the server part.
3. Open up your tease in NYX
4. Open your Tease in script view.
5. Rename the "start#" page from your tease to "teasestart#"
6. At then end, add the following:
Code: Select all
start#page(
   '',

horiz(
 text( ),
  vert(
      text(<img src="http://yourserver.com/rating/showvote.php" valign="bottom" width="400"></img>),
      buttons(starttease#,"<FONT COLOR="#B30033" SIZE="14"><b>Start</b></FONT>")
    ),
 text( )

)
);

rating#page(
   '',

horiz(
 text( ),
  vert(
      text(Rate this tease (1 is the worst,  5 is the best rating):),
      buttons(
rating1#,"<FONT COLOR="#B30033" SIZE="14"><b>1</b></FONT>",
rating2#,"<FONT COLOR="#B30033" SIZE="14"><b>2</b></FONT>",
rating3#,"<FONT COLOR="#B30033" SIZE="14"><b>3</b></FONT>",
rating4#,"<FONT COLOR="#B30033" SIZE="14"><b>4</b></FONT>",
rating5#,"<FONT COLOR="#B30033" SIZE="14"><b>5</b></FONT>",
starttease#,"<FONT COLOR="#B30033" SIZE="14"><b>Start Over (No Voting)</b></FONT>")
    ),
 text( )

)
);

rating1#page(
   '',

horiz(
 text( ),
  vert(
      text(<img src="http://yourserver.com/rating/vote.php?Vote=1" valign="bottom"></img>),
      buttons(starttease#,"<FONT COLOR="#B30033" SIZE="14"><b>Start Over</b></FONT>")
    ),
 text( )

)
);


rating2#page(
   '',

horiz(
 text( ),
  vert(
      text(<img src="http://yourserver.com/rating/vote.php?Vote=2" valign="bottom"></img>),
      buttons(starttease#,"<FONT COLOR="#B30033" SIZE="14"><b>Start Over</b></FONT>")
    ),
 text( )

)
);


rating3#page(
   '',

horiz(
 text( ),
  vert(
      text(<img src="http://yourserver.com/rating/vote.php?Vote=3" valign="bottom"></img>),
      buttons(starttease#,"<FONT COLOR="#B30033" SIZE="14"><b>Start Over</b></FONT>")
    ),
 text( )

)
);


rating4#page(
   '',

horiz(
 text( ),
  vert(
      text(<img src="http://yourserver.com/rating/vote.php?Vote=4" valign="bottom"></img>),
      buttons(starttease#,"<FONT COLOR="#B30033" SIZE="14"><b>Start Over</b></FONT>")
    ),
 text( )

)
);


rating5#page(
   '',

horiz(
 text( ),
  vert(
      text(<img src="http://yourserver.com/rating/vote.php?Vote=5" valign="bottom"></img>),
      buttons(starttease#,"<FONT COLOR="#B30033" SIZE="14"><b>Start Over</b></FONT>")
    ),
 text( )

)
);
7. In the above-noted code, change every "yourserver.com" to the adress of your server.
8. Let the last page of your tease link to "rating#". For Example use:
Code: Select all
delay(5sec, rating#,style:hidden)You're all set, enjoy your new rating feature.
8. Embedding Videos in your Tease
I'll show you how it works with youtube Videos. The technique should basicly work with any other Video Site as well though.
1. Find a Video on youtube. Run it.
2. On the right theres the code to embedd the Video onto websites. Copy that code!.
It should look somewhat like thise:
Code: Select all
<object width="480" height="385"><param name="movie" value="http://www.youtube.com/v/2chc4QUUH8w&hl=de_DE&fs=1&rel=0"></param><param name="allowFullScreen" value="true"></param><param name="allowscriptaccess" value="always"></param><embed src="http://www.youtube.com/v/OCGh1d46Vwc&hl=de_DE&fs=1&rel=0" type="application/x-shockwave-flash" allowscriptaccess="always" allowfullscreen="true" width="480" height="385"></embed></object>So now you need to morph this code into a code nyx can read.
a) Delete everything but
Code: Select all
<embed src="http://www.youtube.com/v/3eZBevXohCI&hl=de_DE&fs=1&rel=0" type="application/x-shockwave-flash" allowscriptaccess="always" allowfullscreen="true" width="480" height="385"></embed>Code: Select all
<img src="http://www.youtube.com/v/3eZBevXohCI&hl=de_DE&fs=1&rel=0" type="application/x-shockwave-flash" allowscriptaccess="always" allowfullscreen="true" width="480" height="385"></img><img src="http://www.youtube.com/v/3eZBevXohCI&hl ... width="480" height="385"></img>[/code]
d) To tell the Video to automaticly play, you need to add: "&autoplay=1" to the URL, like this:
Code: Select all
<img src="http://www.youtube.com/v/3eZBevXohCI&hl=de_DE&fs=1&rel=0&autoplay=1"width="480" height="385"></img>3. Open up your tease in script view, and the page where you want to insert the code.
For example:
Code: Select all
page2#page(
'<TEXTFORMAT LEADING="2"><P ALIGN="CENTER"><FONT FACE="FontSans" SIZE="18" COLOR="#FFFFFF" LETTERSPACING="0" KERNING="0">Instructions , and some more instructions</FONT></P></TEXTFORMAT>',
pic("*.jpg"),
go(start#)
);
Code: Select all
page2#page(
'<TEXTFORMAT LEADING="2"><P ALIGN="CENTER"><FONT FACE="FontSans" SIZE="18" COLOR="#FFFFFF" LETTERSPACING="0" KERNING="0">Instructions , and some more instructions</FONT></P></TEXTFORMAT>',
text(<img src="http://www.youtube.com/v/3eZBevXohCI&hl=de_DE&fs=1&rel=0&autoplay=1"width="480" height="385"></img>),
go(start#)
);
9. set() and unest()
These commands can be used to make the range command (See 3.) generate a page multiple times, or to not generate a certain page after another page is called. It can also be used for the commands seen at 10.
set() and unset() can be used where your buttons or timer are called, you just embed it in a "mult()" function.
It looks like this:
Code: Select all
3#page('Set page one and unset page 2',
pic("*"),
mult(
set(#1),
unset(#2),
go(start#))
);
10. The must(), mostnot(), numactionsfrom() and numactions() commands
I will provide commented code examples for all those functions.
a. must()
A certain page "must" be set in order to show another page.
ie.: Every Punishment must be done, in order to receive release ;).
This Example Requires page 1 to be set in order to call page3.
Code: Select all
must(3,1#)Code: Select all
start#page(
'<TEXTFORMAT LEADING="2"><P ALIGN="CENTER"><FONT FACE="FontSans" SIZE="18" COLOR="#FFFFFF" LETTERSPACING="0" KERNING="0">Page 1 must have been generated in order to show page 3</FONT></P></TEXTFORMAT>',
pic("*"),
go(range(1,3,'page'))
);


1#page('This page shows up if range generated a 1',
pic("*"),
go(start#));


2#page('This page shows up if range generated a 2',
pic("*"),
go(start#));


3#page('This page shows up if range generated a 3',
pic("*"),
mult(
must(3#,1),
go(start#))
);
Does the opposite fromw hat must() does, same parameteres (self,page(no #)).
c. numactionsfrom()
Is used to make an certain count of pages required in order to show a page.
This function requires 3 parameters, while the first one is the page its placed on, the second one is the page its supposed to start counting, and the last one is the number of pages its counting.
This Example requires page 2 and 3 to be set. Meaning, only after the (ie.) "range(See 3.)" command generated page 2 and 3 page 1 will be triggered.
Code: Select all
start#page(
'<TEXTFORMAT LEADING="2"><P ALIGN="CENTER"><FONT FACE="FontSans" SIZE="18" COLOR="#FFFFFF" LETTERSPACING="0" KERNING="0">Page 1 will only show after Page 2 and 3 have been shown.</FONT></P></TEXTFORMAT>',
pic("*"),
go(range(1,3,'page'))
);


1#page('This page shows up if range generated a 1',
pic("*"),
mult(
 numactionsfrom(1#,2#,1),               //Comment: Parameters: 1#(page its located on, 2#(page its supposed to start counting),1(counts 1 page)
go(start#));
);


2#page('This page shows up if range generated a 2',
pic("*"),
go(start#));


3#page('This page shows up if range generated a 3',
pic("*"),
go(start#));
d. numactions()
The same as numactionsfrom, only that it always starts counting at page 1 and thus only requires two parameteres. First Parameter: Self, Second Parameter: Count.
Code: Select all
numactionsfrom(1#,2). __________
That's it.
I hope you found it helpful and got an Idea how to customize your flashteases. Feel free to play around with all the functions seraph0x created to make individual flash-teases ;).
If you got any questions concerning the methods described here, feel free to ask.
Also feel free to suggest more tips/tricks.
-green-